As many of us likely do, I have several old photographs that I inherited as my relatives have passed on. I have been diligent about getting them out of the old dangerous photo albums of years past, but I have not been as good at getting them scanned in so that I can have a digital copy as well. During the past few weeks, I have been doing just that!
I thought I would share some lessons learned as well as some helpful tips.
When I originally removed the photos from their individual photo albums, I had put them in archival sheet protectors made for photographs. There are several kinds with different size pockets and I have a variety. Some have 2 pockets for 5x7, some have 3 pockets for 4x6 and then some have a combination with some smaller pockets. I found it best to by a few packages of each variation since my photos are in many different sizes. After I got them all in the sheet protectors, I put them in 3 ring binders.
Before you start scanning, I have the following tips for you to think about:
Tip Number 1: Decide how you would like to organize the physical photos going forward.
I chose to arrange mine by person and then chronologically as best I could. This posed a challenge when multiple people were in the same photo. When that happened, I chose to include the photo with the relative closest to me. If both a grandfather and grandmother were in the photo, I chose to always place those with the male.
Tip Number 2: Decide where you want to store your digital photos on your computer.
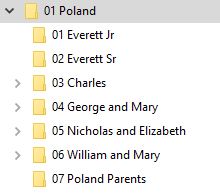
I chose to store mine with my digital sources. I have a folder for each of my 8 great grandparents Surnames.
Inside each surname folder, I have a folder for each generation I have files for.
For families where I have several items for multiple children, I have sub-folders for each child.
Tip Number 3: Decide on a naming convention for your digital photos ahead of time.
I have a naming convention I used for my sources and I followed that same naming convention for my photos. My naming convention is:
SURNAME - year - sourcetype - description
For example: POLAND - 1900 - US Cen - Charles
I have several source types: US Cen, Marr, Newspaper Title, Bir, Dth, Obit, Bur, Cem, and Pic to name a few. If multiple people are represented by a single source, I name it based on the head of household.
This naming convention allows me to see a timeline of sources when I'm looking at my files on my computer. For women, I use the maiden surname until she marries and then I use the married surname. For example, my grandmother Kathryn has documents and photos in the Putnam folder (her maiden name) until she married my grandfather. After the marriage, any document or photo is stored in my grandfather's folder. I store prior or subsequent marriages under her maiden folder and only those records and photos created when she was married to my grandfather are in his folder.
For photo file names I use the date, if known, otherwise I just use Pic to indicate the file is a picture. For example the below picture is named: POLAND - 1943 - Pic - Everett and Kathryn
I do not know when the photo below of my great-grandfather was taken, so it is just named: PUTNAM - Pic - Wm Earl
The process or system that I used to scan all the photos into the computer was:
- Pulled all the photos out of their sheet protectors and sorted them by person and time.
- Placed as many photos onto the scanner bed as possible.
- Scanned the lot of photos at 1200 dpi
- Once the scan was complete, I opened the image containing all the photos from the scanner bed and cropped each one into it's own file using the file naming convention noted above.
- After all the digital photos were named and stored, I deleted the original scan image and placed the physical photos back in sheet protectors.
- I placed the filled sheet protectors into 3 ring binders by family name.
As a final thought, I want to mention that I did this same process to all the paper photos of my kids that I have as well. We often forget to document and preserve our current generation like we do the past ones.


